My ClickBD

Brand new
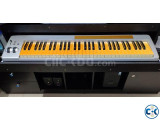
New Roland XP-60 Upgraded with USB Drive with Hard Case.
Lowest price in Bangladesh:
Highlights
- New/Used: New
- Type: New
- Color: Black
Seller info
Sold by:
Sumon
Member since:
08 Dec 2011
Location:
Dhaka Dhanmondi
Safety tips:
Don’t pay in advance
Meet in a safe & public place
Meet in a safe & public place
Description
DESCRIPTION for New Roland XP-60 Upgraded with USB Drive with Hard Case. price in Bangladesh
|
New Roland XP-60 (Made in Japan) Upgraded with USB Drive with Hard Case, Orginal Owner Menual, Power Cable and CD for Demo, Softwere. Call Me For Price: 01819424222. THERE IS UPGRADED WITH A USB DEVICE From Roland Corporation U.S. ITS EASY TO TRANSFER DATA WITH USB PEN DRIVE. Using USB Stick (Pen Drive) to Keyboard: Instructions ________________________________________ One USB Stick replaces 100 floppies The USB Floppy Disk Converter in multi-disk mode behaves as if only one floppy were to be emulated. Please first read Chapter 1.USB Stick replaces 1 floppy. When more than one floppy are managed by just one USB Stick, the desired floppy can be selected with the selection button (UP/DOWN).The display always shows you the currently set floppy from 00 to 99. Preliminary steps: To manage up to 100 virtual floppies on one USB Stick, you must first create virtual floppies on the USB Stick. Connect the USB Stick into the USB port on your PC. Format the USB Stick with tool provided. Switching from one virtual floppy to another Example: Let us assume you want to use the 4th floppy (i.e. Floppy 03) and the USB Stick is not yet connected to the USB Disk Converter. Insert the USB Stick into the USB Floppy Disk Converter. The display of the USB Disk Converter now shows (00), i.e. the first floppy. Use the right selection button to change over to Floppy (just tap lightly until "03" appears on the display). When you have selected Floppy 03, the display shows (03 with dots) for some time. The dots indicate that the selected Floppy is just being initialized. Please wait until the dots disappear from the display before you continue to use the USB Stick (reading, writing or removing). Please make sure the Busy LED (red) is not on. Should the Busy LED be on, this indicates an ongoing reading or writing process. In that case, please wait until the read/write process has been completed. You can now use the selected (virtual) floppy just as you used to do with your customary floppies. If you want to now change from Floppy 03 to 01, proceed in the same way. Here are the individual steps to take: Starting point: The display shows , and you want to select . 1. Make sure the Busy LED (red) is not on. 2. Press right button 8 times to cycle thru 4,5,6,7,8,9,0 and then 1 Note: Once you have selected the desired floppy, you should always wait until the dots next to the digits in the display disappear. These indicate that the selected floppy is still being initialized. If you start writing on the floppy during the initialization phase, you may incur faults or data loss. Reading and writing During the reading or writing process (data are being saved on or read from the virtual floppy) the red Busy LED lights up. During this process, do not under any circumstances remove the USB Stick or deploy the selection buttons. Please always wait until a read or write process has been completed, before you continue, or else you may thereby cause data loss. Safely remove USB Stick from USB Floppy Disk Converter Only remove the USB Stick when the Busy LED (red) is not on. When a read/write process has just been completed, but the LED is still on for a moment, please wait for a couple of seconds before you remove the USB Stick. |